Microsoft 365 - Native Backup (A first look)
- Chris Hudson

- Jan 23, 2024
- 12 min read
Updated: Feb 7, 2024
Wait a minute - Microsoft now offer a native Microsoft 365 Backup solution?
Following on from a previous announcement back in 2023, Microsoft has begun rolling out their new & native offerings to cater for an organisation's Backup and Archive requirements, at least where Microsoft 365 data is concerned, which until now, had usually been accommodated via third-party services and products.
Both Microsoft 365 Backup and Microsoft 365 Archive are now available in Public Preview, meaning, we can finally get our hands on and begin adopting both solutions, assuming we're happy to accept some of the initial public preview limitations. For this blog post, we'll be primarily focusing on the new Microsoft 365 Backup solution in its current Public Preview state.

Microsoft 365 Backup aims to protect organisations in the event of accidental or malicious data loss, ransomware attacks, and/or data-related security breaches, by periodically creating immutable backups across the data estate within Microsoft 365; SharePoint Online, OneDrive, and Exchange Online. These backups are then made easily restorable and recoverable within the Microsoft 365 ecosystem, without ever having to leave it. Additionally, the solution also respects geographical residency requirements as data never leaves the Microsoft 365 trust boundary or the geographical locations of the tenant's current data residency. Furthermore, if an organisation would prefer, they can also leverage this new technology via a third-party service that is built on top of Microsoft's new Backup APIs - This is particularly useful if an organisation has a preferred partner for backup or if they have any non-Microsoft 365 data that also requires backing up.
Microsoft 365 Archive, on the other hand, addresses the challenges relating to content growth across Microsoft 365, i.e., within SharePoint Online. In line with an organisation's organic growth, it's accepted that the amount of data they withhold will indefinitely expand, but as a consequence of this, the amount of free storage within SharePoint, for example, will subsequently decrease. However, as time progresses, some of this content will naturally become less active and less accessed, meaning that whilst it must be maintained and not deleted, if we can help it, we don't want it to absorb valuable storage quotas within Microsoft 365. This is where Microsoft 365 Archive comes into play by offering a "cold" storage tier that enables an organisation to securely and compliantly store inactive data within SharePoint Online, but at a more cost-effective price that doesn't take away from the standard SharePoint quotas. Using this Archive capability, an organisation can easily archive but also reactivate content easily and efficiently from within the SharePoint interface.
As mentioned previously, for this particular blog post, we'll be focusing on Microsoft 365 Backup. However, if Microsoft 365 Archive is also of interest, you can find my "first look" at the solution here.
Before we delve in, it's probably useful that we understand some basic terminology relating to the service: -
Protection units: Reflect the supported products for Microsoft 365 Backup, such as SharePoint, OneDrive, and Exchange.
Restore point: Reflects a previous point in time from which an administrator can restore data from, essentially reflecting previous backups.
RPO - Reflects how close in time the most recent restore point is to an impacting event, stands for Recovery Point Objective.
RTO - Reflects how fast a restore to a prior point in time can occur, stands for Recovery Time Objective.
Microsoft currently offer the following RPO's: -
And provide the following as example RTO's: -
All sound good?
Let's jump into Microsoft 365 Backup: -
Prerequisites
Licensing
The pricing / licensing model for Microsoft 365 Backup is based on a pay-as-you-go model, facilitated via Microsoft Syntex. The current cost per unit is listed at $0.15 per GB per month - However, these prices are subject to change when the product reaches general availability.
Whilst Microsoft 365 Backup isn't specifically part of the Syntex product suite, it does still leverage the Syntex billing model to ensure consistency with other Microsoft 365 pay-as-you-go offerings.
Additionally, if an organisation opts to integrate Microsoft 365 Backup with a third-party offering, the vendor may charge a different rate for their service.
Useful Links
Billing Model: https://learn.microsoft.com/en-gb/microsoft-365/syntex/backup/backup-pricing
Syntex Billing: https://learn.microsoft.com/en-us/microsoft-365/syntex/syntex-azure-billing
Pricing Calculator: https://aka.ms/M365BackupCalculator
Enabling Microsoft 365 Backup
The first step within the process oversees the initial enablement of the Microsoft 365 Backup Service, which also bears witness to the enablement of the Syntex-pay-as-you-go billing model, assuming that it hasn't already been enabled, which the backup solution relies upon.
Before continuing further, as a prerequisite, please ensure you have an Azure Subscription and encompassing Resource Group available and ready as the setup process for the Syntex-pay-as-you-go billing model requires them. If you'd like further information on this, please refer to: - Configure Microsoft Syntex for pay-as-you-go billing.
1. Within the Microsoft 365 admin portal, navigate to "Setup", locate the "Files and content" section, and then click "Use content AI with Microsoft Syntex".
2. Next, click "Set up billing" to provision the Syntex-pay-as-you-go billing model.
3. Within the "Set up pay-as-you-go" billing fly-out pane, select an existing and appropriate Azure Subscription and Resource Group, and then specify a desired region. Next, review and accept the terms of service before clicking "Save".
4. Wait for the pay-as-you-go billing model to be provisioned.
5. Once the Syntex pay-as-you-go billing model has been successfully set up, click "Manage Microsoft Syntex" on the previous screen.
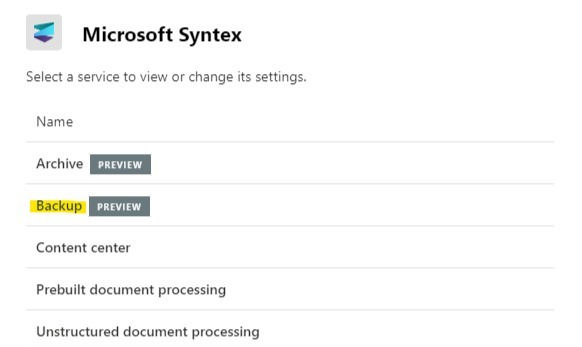
6. Within the "Microsoft Syntex" fly-out pane, select "Backup" from the list of services.
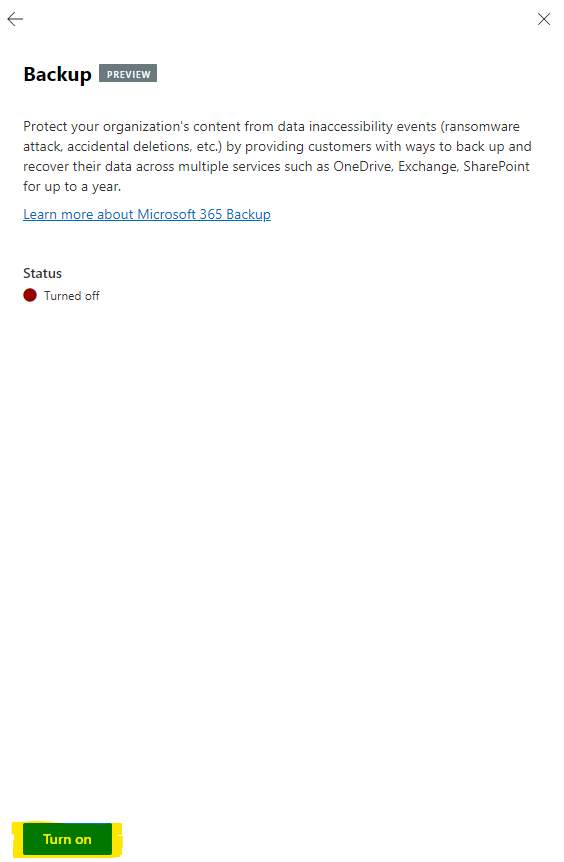
7. Select "Turn On" to enable the Microsoft 365 Backup provision, followed by clicking "Save" at the next window.
8. Verify that the Microsoft 365 Backup service has been successfully turned on.
Configuring Microsoft 365 Backup
Now that the service is enabled, it's time to configure Microsoft 365 Backup. For this walk-through, we're going to configure Microsoft 365 Backup policies for SharePoint Online and Exchange Online.
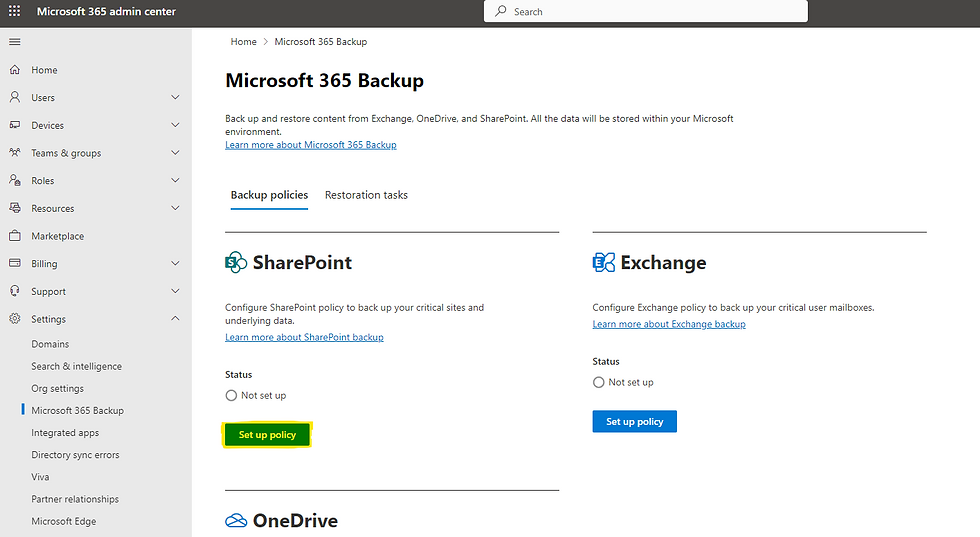
1. Within the Microsoft 365 admin portal, navigate to "Settings" and then click "Microsoft 365 Backup"
2. Within the Microsoft 365 Backup blade, you'll notice the listed Microsoft 365 products that are supported for backup & restore activities. We're going to start with SharePoint, so we'll click "Set up policy" within the SharePoint section.
3. Within the setup wizard, notice and acknowledge the Microsoft-defined "Backup frequency" and "Backup retention" attributes for the in-scope Microsoft 365 product, and then click "Next".
4. At the "Protection scope" screen, there are three options available to scope and target the desired destination/s for backup: -
Add via search = Manually search for and select the desired target destination/s.
Add via rules = Use rules to dynamically target the desired destination/s - However, please note at the time of writing, these rules reflect a one-time run, meaning any new sites created in the future that match the specified rule will not dynamically or automatically update the scope of the backup policy.
Import from file = Upload a prepopulated CSV file to target the desired destination/s.
5. In this example, we will leverage the manual "Add via search" option to search for and select the organisation's "Marketing" SharePoint site, which in turn will put the Marketing site in-scope for Microsoft 365 backup.
For illustrative purposes, however, we will also demonstrate the "Add via rules" option by choosing to use the "Site name or URL contains" dynamic rule.
In this example, say we want to target all existing SharePoint sites within the environment. To do this, we will identify and obtain the static part of the organisation's SharePoint URL, which in this case, is "threesixtythrive".
We'll then enter "threesixtythrive" as a value under the "Site name or URL contains" dynamic rule option, and then click "View matching sites".
As mentioned previously, please remember that at the time of writing, these rules reflect a one-time run, meaning any new sites created in the future that match the specified rule will not dynamically or automatically update the scope of the backup policy.
Within the screenshot below, we can see that all the organisation's existing SharePoint sites have been matched, and therefore put in scope for the backup policy.
As mentioned, for this demonstration, we'll continue by leveraging the manual "Add via search" option only where the previously added "Marketing" site exists.
Once the relevant scope has been defined for the policy, click "Next".
6. At the "Review and Finish" screen, review the configuration and then click "Create Policy".
7. Finally, once the policy has been successfully created, click "Done".
8. Next, we're going to move on to the Exchange product, but first notice that the "SharePoint" section now has a status of "Processing" rather than "Not set up".
Now, we'll click "Set up policy" within the Exchange section.
9. Again, within the setup wizard, notice and acknowledge the Microsoft-defined "Backup frequency" and "Backup retention" attributes for the in-scope Microsoft 365 product, and then click "Next".
10. At the "Protection scope" screen, there are similar options available to SharePoint when it comes to scoping and targeting the desired destination/s for backup, albeit the "Add via rules" section offers different attributes.
11. In this example, we will leverage the manual "Add via search" option again to search for and select the organisation's "Sales" Exchange Mailbox, which in turn will put the Sales mailbox in scope for Microsoft 365 backup.
Once the relevant scope has been defined for the policy, click "Next".
12. At the "Review and Finish" screen, review the configuration and then click "Create Policy".
13. Finally, once the policy has been successfully created, click "Done".
14. If desired, the above processes and procedures can be repeated for any other supported Microsoft 365 products that need to be in-scope for Microsoft 365 Backup, such as OneDrive.
15. Going forward, administrators can click the corresponding "View details" button within each product section to review and modify these backup policies.
Testing Backup & Restore
Now that the service has been enabled and configured, in this section, we're going to look at testing the backup and restore capability of Microsoft 365 Backup.
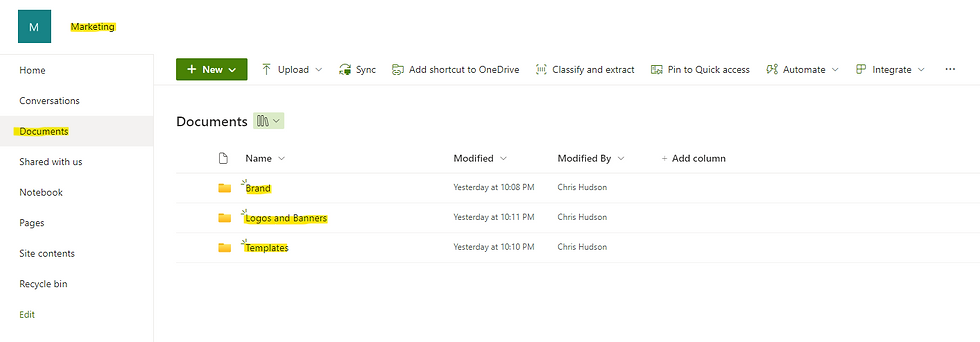
First, let's take our Marketing SharePoint site, which has the following data present: -
To replicate a data loss scenario, this data has now been manually and permanently deleted from the Marketing site: -
Secondly, let's take the Sales mailbox, which has one lonely e-mail present: -
To replicate a data loss scenario, this e-mail has now been manually and permanently deleted from the Sales mailbox: -
1. Within the Microsoft 365 admin portal, navigate to "Settings" and then click "Microsoft 365 Backup". Next, locate the product that needs restoring and then click its corresponding "Restore" button.
2. Within the restore wizard, at the "Type of content" screen, select the type of content you'd like to restore. In this example, we're going to start by restoring the Marketing SharePoint site so we will choose "SharePoint site content".
3. At the "Site to restore" screen, click "Add sites", and then specify the locations you'd like to restore. In this example, we're going to select the previously backed-up "Marketing" site.
4. Once all the restoration points have been specified, click "Next".
5. At the "Date and time" screen, specify the desired date and time from which you'd like to restore from. Please note that the automatically returned backup will be the one that is closest to the time specified, but always before and not after the time specified.
6. At the "Confirm restore points" screen, review the automatically chosen backup, specifically the corresponding restore point timestamp. If you are content with the offered restore point, click "Next". Otherwise, please refer to the next screenshot within this step.
If the restore point that has been offered doesn't meet requirements, you can click the 3-dotted menu icon correlating to the restoration point and then click "Select a different backup".
7. At the "Set destination" screen, determine whether the restoration activity should restore data to the original site that was backed up in the first place, or whether a new site should be created and restored to. In this example, we'll restore the data to the original site.
8. At the "Review and Finish" screen, review the restoration task and then click "Restore sites".
9. Finally, once the task has been successfully created, click "Done".
10. Back within the Microsoft 365 Backup blade, after selecting the "Restoration tasks" tab, we can see that the newly created restoration task is in progress.
11. We'll now repeat the above process but for the Exchange product, specifically the Sales mailbox, by clicking "Restore" within the Exchange section.
12. This time, within the restore wizard at the "Type of content" screen, we're going to restore specific mail content for the Sales mailbox, so we'll select "Exchange mailbox content".
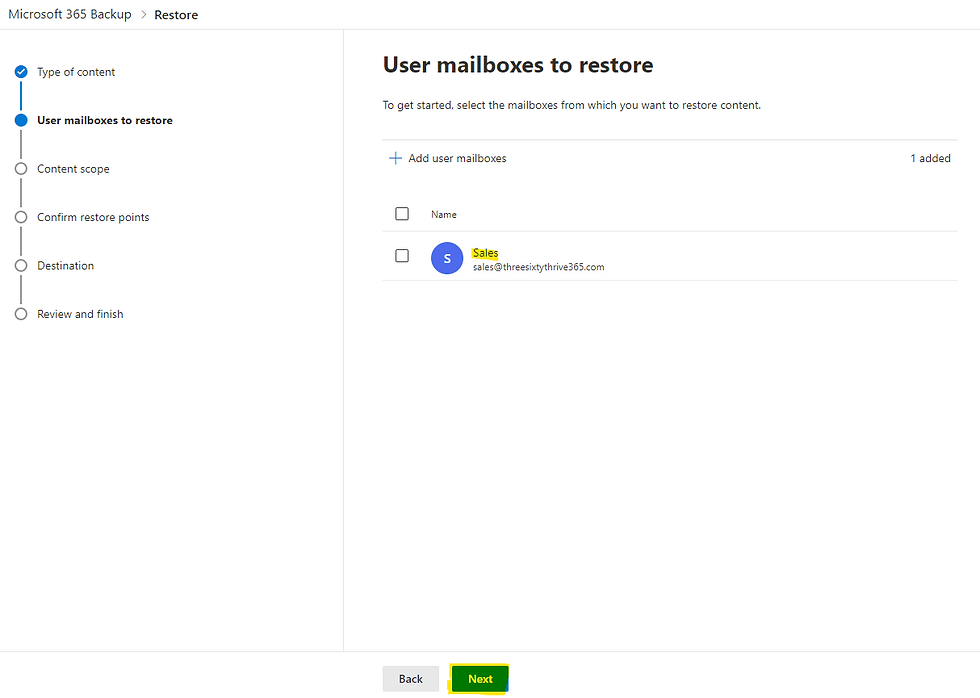
13. At the "User mailboxes to restore" screen, click "Add user mailboxes", and then specify the locations you'd like to restore. In this example, we're going to select the previously backed-up "Sales" mailbox.
14. Once all the restoration points have been specified, click "Next".
15. At the "Content scope" screen, there are two options available to select the content that should be restored: -
All emails, notes, contacts, calendars, and tasks = Restores all mail content within a chosen backup snapshot.
Selected content only = Restores only specific content that has been defined within a time frame and via at least one filter rule.
In this example, we'll opt for the "Selected content only" option, where we will specify that only mail objects from the last 24 hours should be restored, and only those that match the filter rule "Email from" Chris Hudson - Essentially, we only want to restore e-mail received from Chris Hudson within the last 24 hours. Other filter rules include "Has Attachment", "Subject has the keywords", and "Email to".
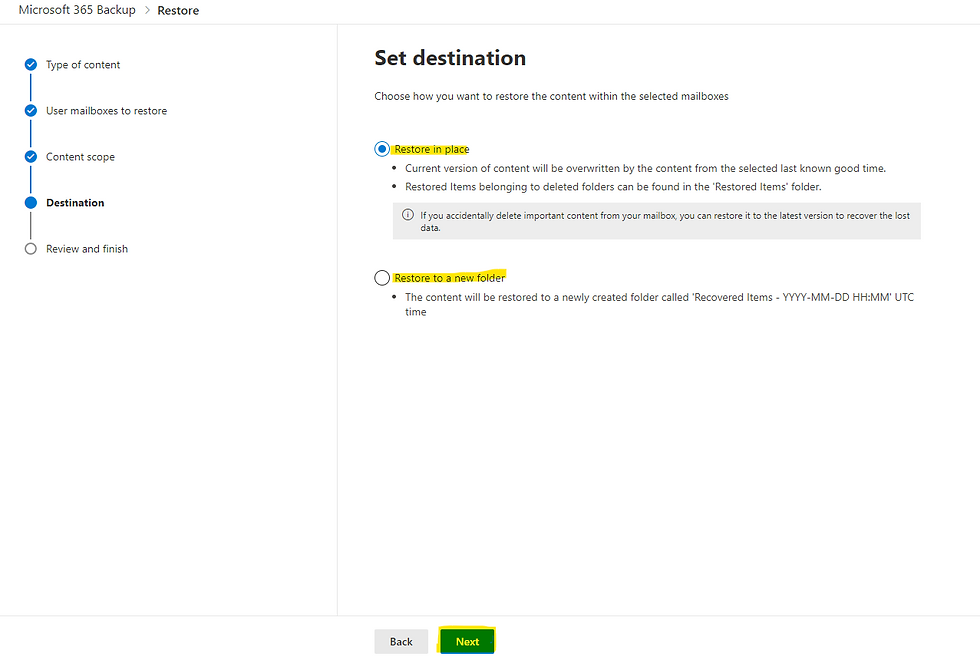
16. At the "Set destination" screen, determine whether the restoration activity should restore data in place from where it was backed up from, or whether a new mailbox folder should be created and restored to. In this example, we'll restore the data to the original in-place location.
17. At the "Review and Finish" screen, review the restoration task and then click "Restore user mailboxes".
18. Finally, once the task has been successfully created, click "Done".
19. Once again, back within the Microsoft 365 Backup blade, after selecting the "Restoration tasks" tab, we can see that the newly created restoration task is in progress alongside the previously created one.
20. Both restoration tasks have now completed their activities, meaning the previously lost data should now have been restored successfully as per our instruction.
Within the "Marketing" SharePoint site, we can see that the data has been successfully restored: -
And within the "Sales" mailbox, we can also see that the one e-mail has also been successfully restored: -
Reporting & Logs
There aren't any "official" reporting or log locations for Microsoft 365 Backup that we've come across yet, however, there are a few locations you can review for various purposes.
Microsoft 365 Backup Blade
Starting within the Microsoft 365 Backup blade, within the "Backup policies" tab, we can click "View details" against any listed Microsoft 365 product for backup. Within the fly-out pane, we can see who last modified the backup policy (if configured), and when.
Additionally, within the "Restoration tasks" tab, we can retrieve a list of all current and historical restoration tasks that have occurred within the environment, along with their scope, status, creation dates, completion dates, and the initiator.
Microsoft 365 Audit Log / Compliance Log
Whilst browsing around, we also noticed that the following events were captured within the Microsoft 365 Audit Log during the restoration activities. Whilst we wouldn't be confident in saying that these events are definitely related, we can confirm that no other activities were occurring within the environment during the restoration period.
The Future & Considerations
The previous absence of a native Microsoft 365 Backup solution has long been questioned by technical professionals and customers alike, but with these questions now being answered, we can only expect that the solution will be heavily adopted in the coming months and years.
It is important to note, as always with any technology in preview, that there will be limitations present and potentially further developments or changes planned before the solution reaches general availability.
At the time of writing, as the feature is in its early Public Preview state, there are a few limitations present with the Microsoft 365 Backup solution. Some notable ones are listed below: -
Only full SharePoint sites and OneDrive accounts can be restored, meaning file-level granularity for restoration isn't currently possible, but will be in the future.
Currently, SharePoint, OneDrive, and Exchange are supported for Microsoft 365 Backup. However, support for Microsoft Teams is coming soon.
Only one active backup policy per supported product can be configured currently, but this is expected to increase in the future.
If an organisation has adopted the multi-geo feature within SharePoint and OneDrive, backup and restore activities may not work correctly - It is recommended in this case that the solution is not adopted during its Public Preview phase until multi-geo is fully supported.
SharePoint Sites and OneDrive accounts that have been deleted and are in the first stage recycle bin must be restored from the recycle bin before they can be restored to a prior point in time.
Administrators operating the Microsoft 365 Backup tool will need to have at least read-only permissions to any in-scope SharePoint sites. In the future, however, a new and dedicated backup role will be introduced.
SharePoint sites and OneDrive accounts that are actively been restored to are not locked in a read-only state, meaning users may continue to edit and modify files that will be later overwritten and restored. In the future, a read-only locking capability will be introduced for in-scope locations.
Any Mailboxes or OneDrive accounts that are under a legal or in-place hold cannot currently be restored unless the hold is lifted and removed.
Any SharePoint sites and OneDrive accounts that have witnessed a tenant rename, tenant move, or site URL change will not be "undoable" during a restore activity.
Regarding Exchange backup, calendar backup and restore activities are limited to modified items only and deleted items are not supported.
You can keep up to date with these limitations, as well as review additional ones not referenced above at the following link: - Preview limitations in Microsoft 365 Backup (Preview) - Microsoft Syntex | Microsoft Learn
Links
View and edit backup policies in Microsoft 365 Backup (Preview) - Microsoft Syntex | Microsoft Learn
Frequently asked questions about Microsoft 365 Backup (Preview) - Microsoft Syntex | Microsoft Learn











Comments